
This is my favourite recipe for the best maple apple pie. Even better than a traditional apple pie, this maple-flavoured apple pie recipe is made with maple-roasted apples, which are tossed with maple sugar before pouring into the pie crust and baking. This incredible apple pie is made with roasted apple slices, which allows you to pack more apples into your apple pies!
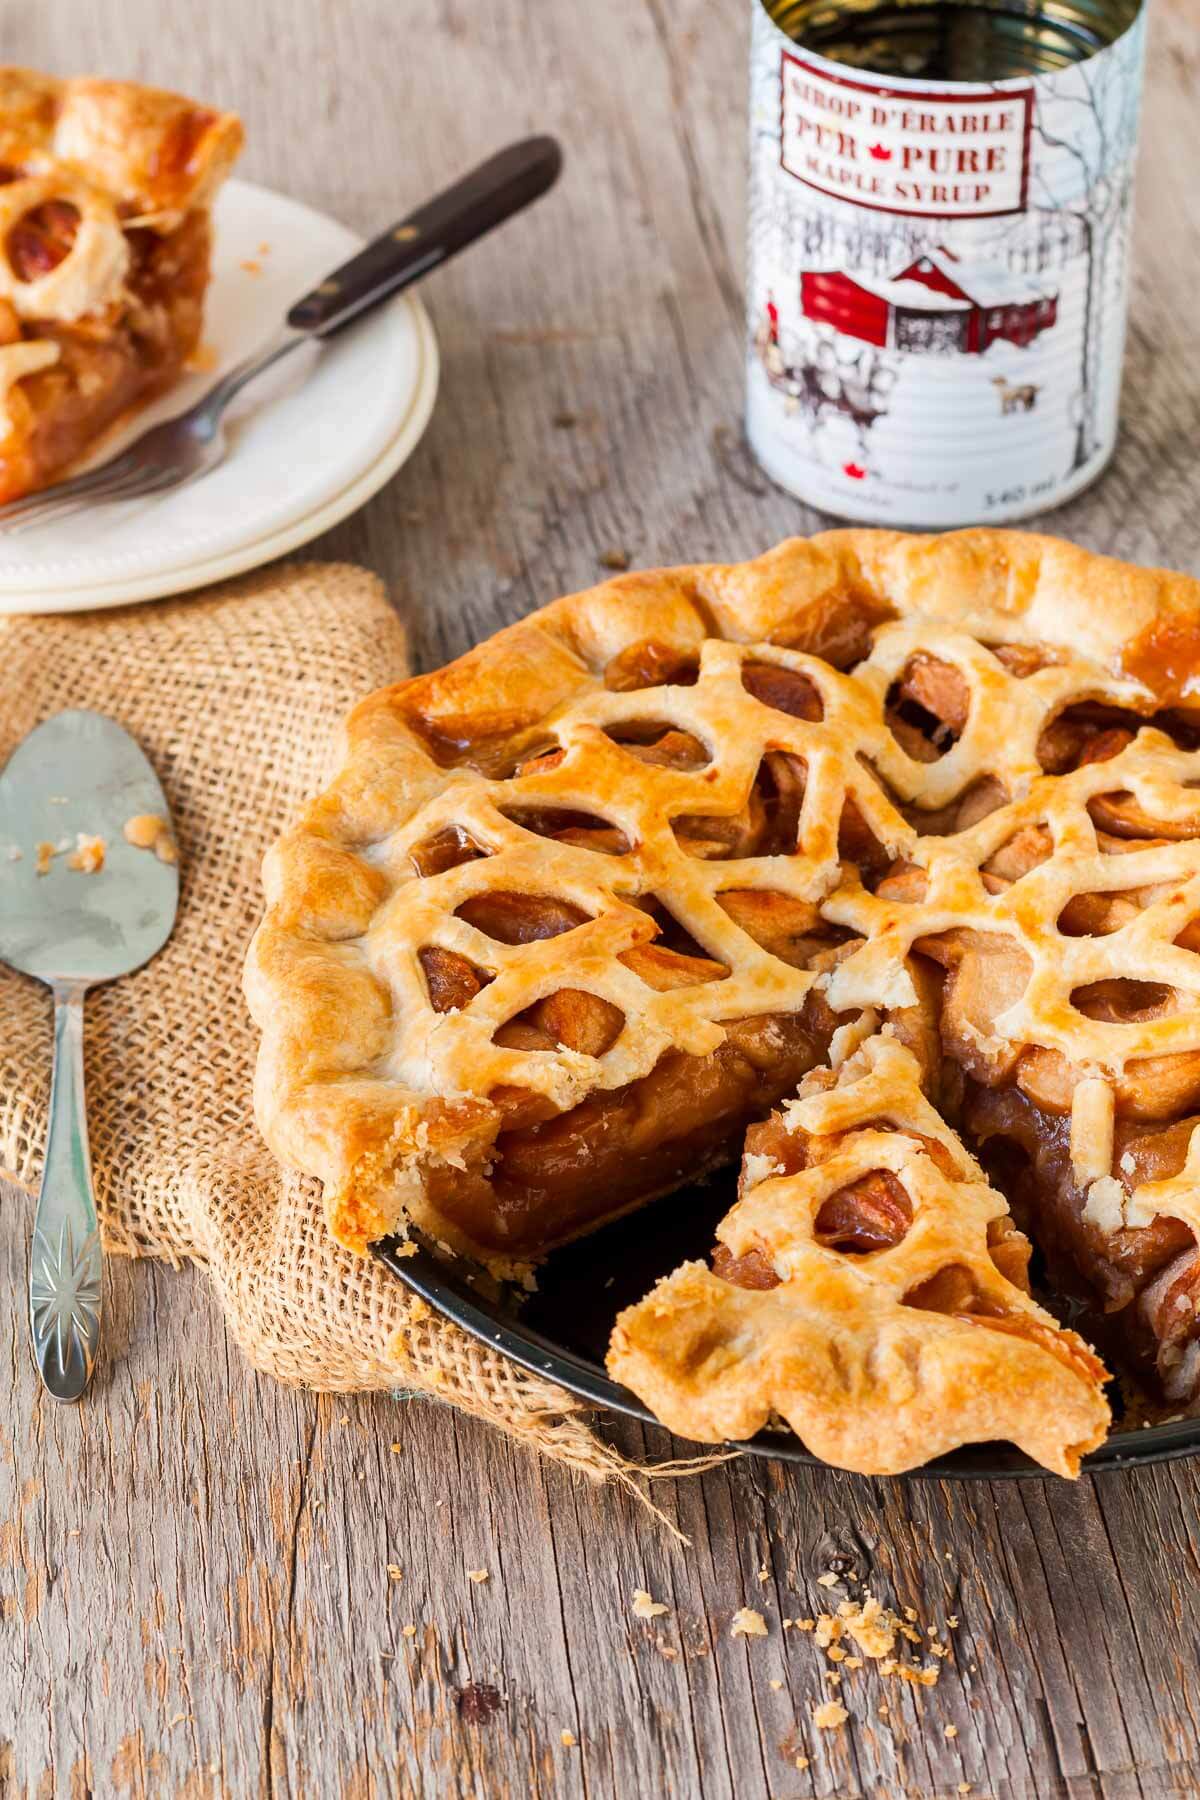
The technique behind this recipe is what makes it extra special. Roasting the slices of apples before filling the apple pie allows you to cram over 4 pounds (2 kilos) of apples into one single 9-inch apple pie! This is a technique I also use for rhubarb pie and rhubarb crumble, allowing me to load up my fruit desserts with lots of fruit.
Jump to:
What You Need to Make Maple-Flavoured Apple Pie
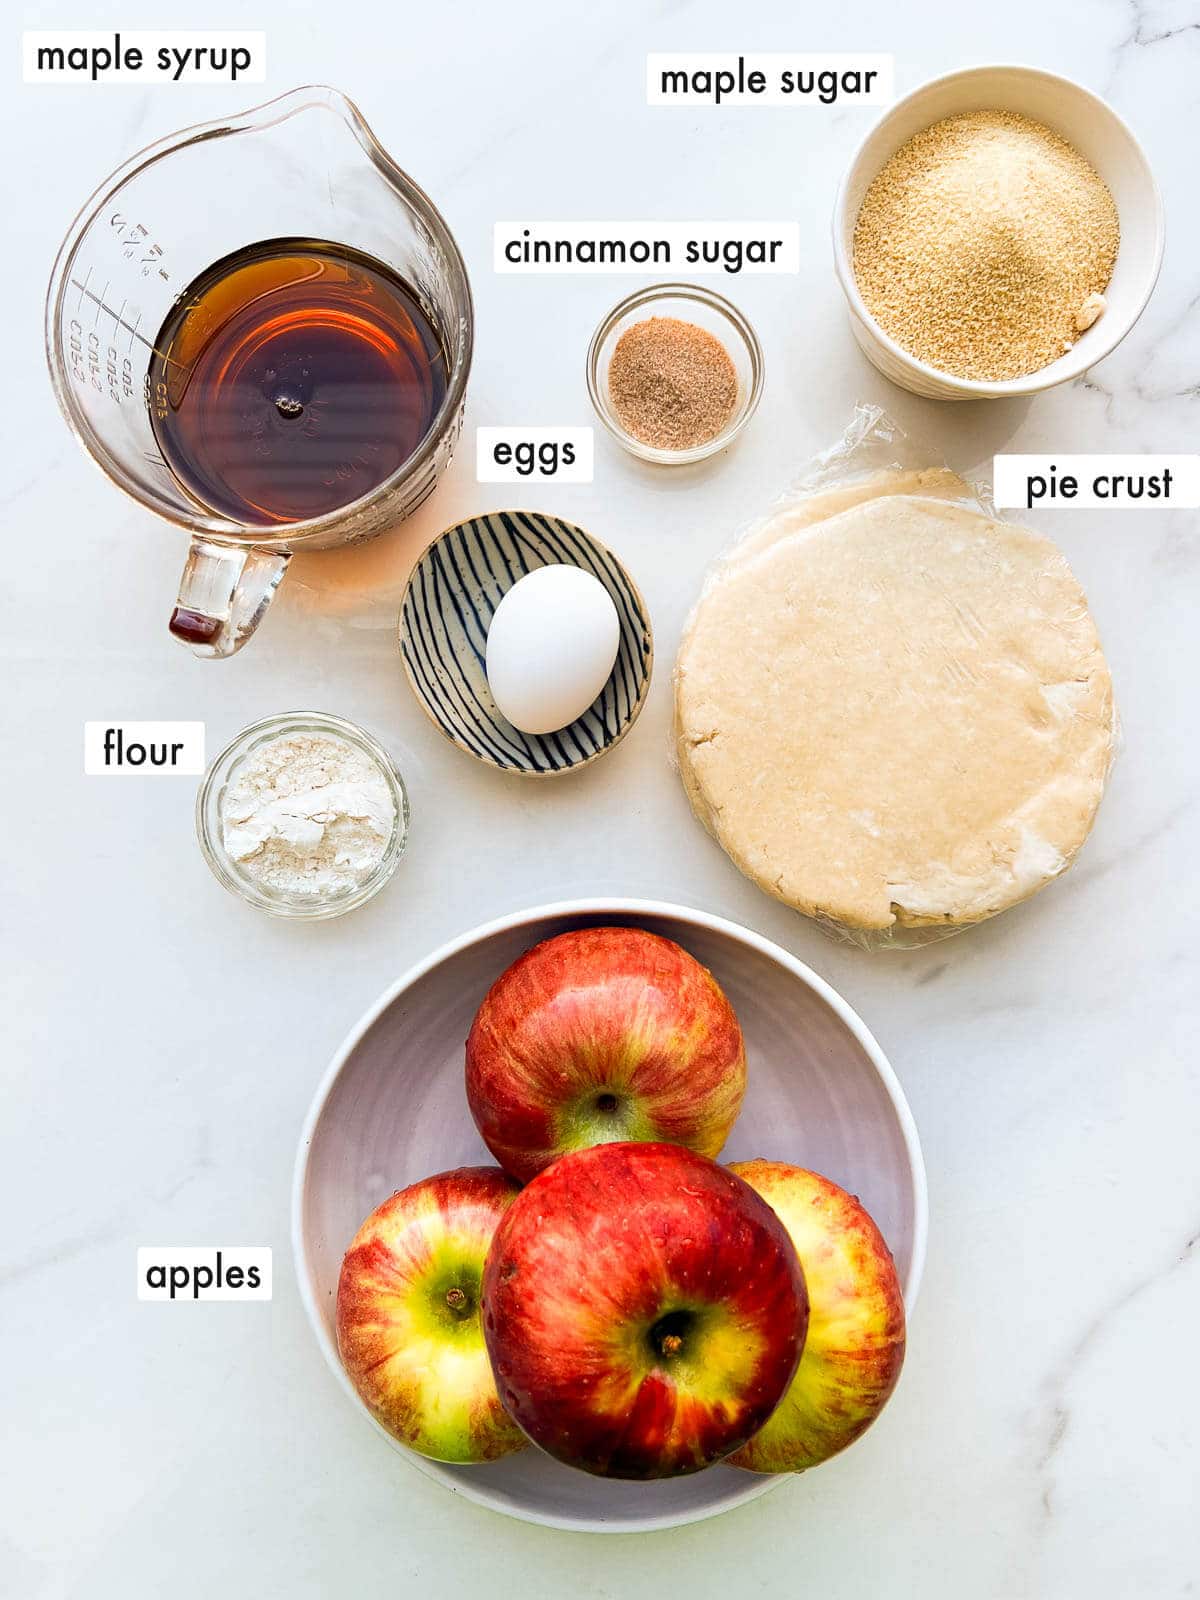
- pie crust—I bake most of my pies with all-butter pie crust made in the food processor. You can also make pie dough by hand or use a stand mixer to make flaky crust
- apples—bake pies with the freshest apples you can get. Use apples that can withstand heat without breaking down, such as Cortland (what I generally use), Honeycrisp, Granny Smith, Gala, or even Golden Delicious. Don't use Macintosh apples which will turn the filling to sauce
- maple syrup—use pure maple syrup, not pancake syrup (which is flavoured corn syrup)
- maple sugar—you may need additional maple sugar to sweeten the pie filling. It depends on the apples you choose and whether they are very acidic and tart-tasting
- egg—the egg is diluted in a little water for the egg wash that you brush on the top crust before baking. This allows the turbinado or cinnamon sugar garnish to adhere to the top of the pie. You can replace it with whipping cream
- flour—we are using just a little flour as the thickener for the filling because the pre-roasted apples don't need a strong thickener
- cinnamon sugar—garnish the top crust with turbinado sugar or cinnamon sugar
Please see the recipe card for the exact ingredients and quantities.
Variations And Substitutions
- Spices: Sometimes, I add a little cinnamon to the filling or a teaspoon of pumpkin pie or apple pie spice mix
- Vanilla: Sometimes, I add a teaspoon of vanilla bean paste to the filling, but you don't have to. You can also add vanilla extract instead.
How To Make Apple Pie With Roasted Apples
Start by roasting the apples because they will need to cool down completely before you make your pie!
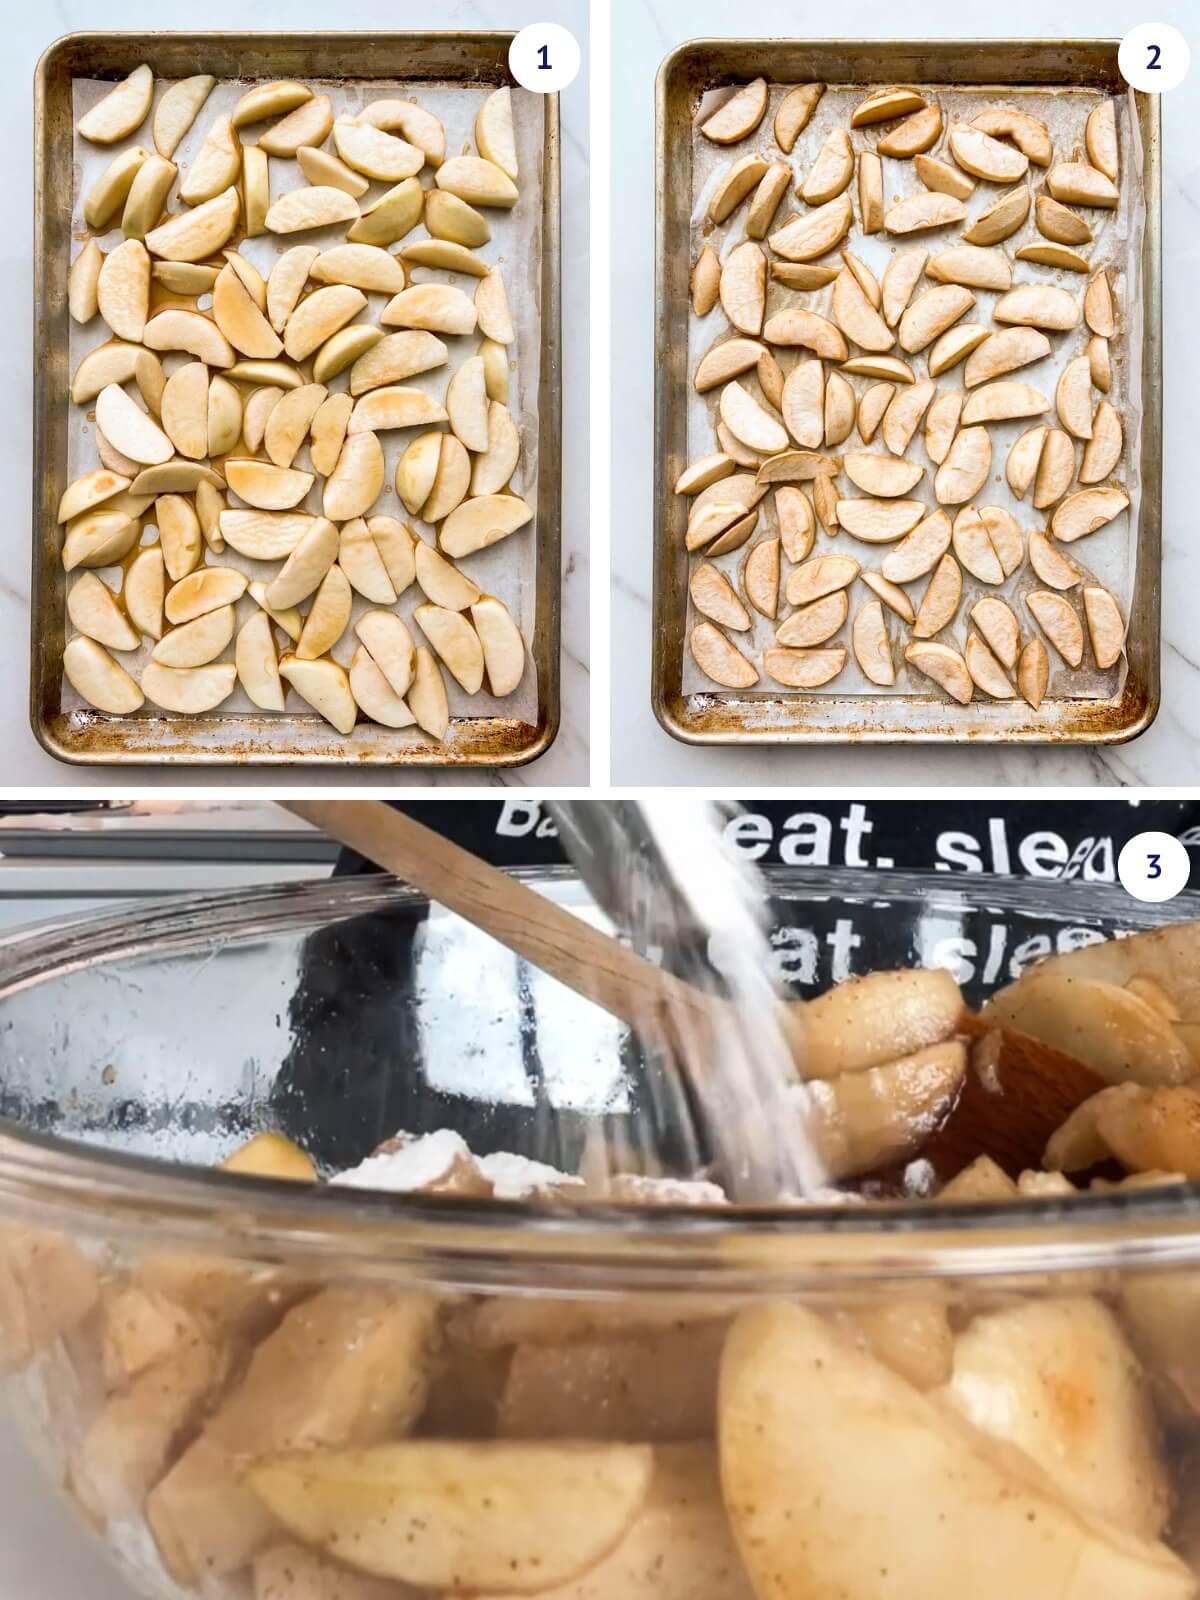
Step 1—Combine sliced apple with maple syrup on two half-sheet pans (image 1) and roast until softened (image 2). Let cool completely, then transfer the roasted apples to a bowl and mix with flour and extra maple sugar (if using) (image 3).
Tip: Make your pie dough before roasting your apples. Then while you work on the apples, your pie dough has time to chill. By the time the apples are done baking, you will be able to roll out the dough and move on to the next steps!
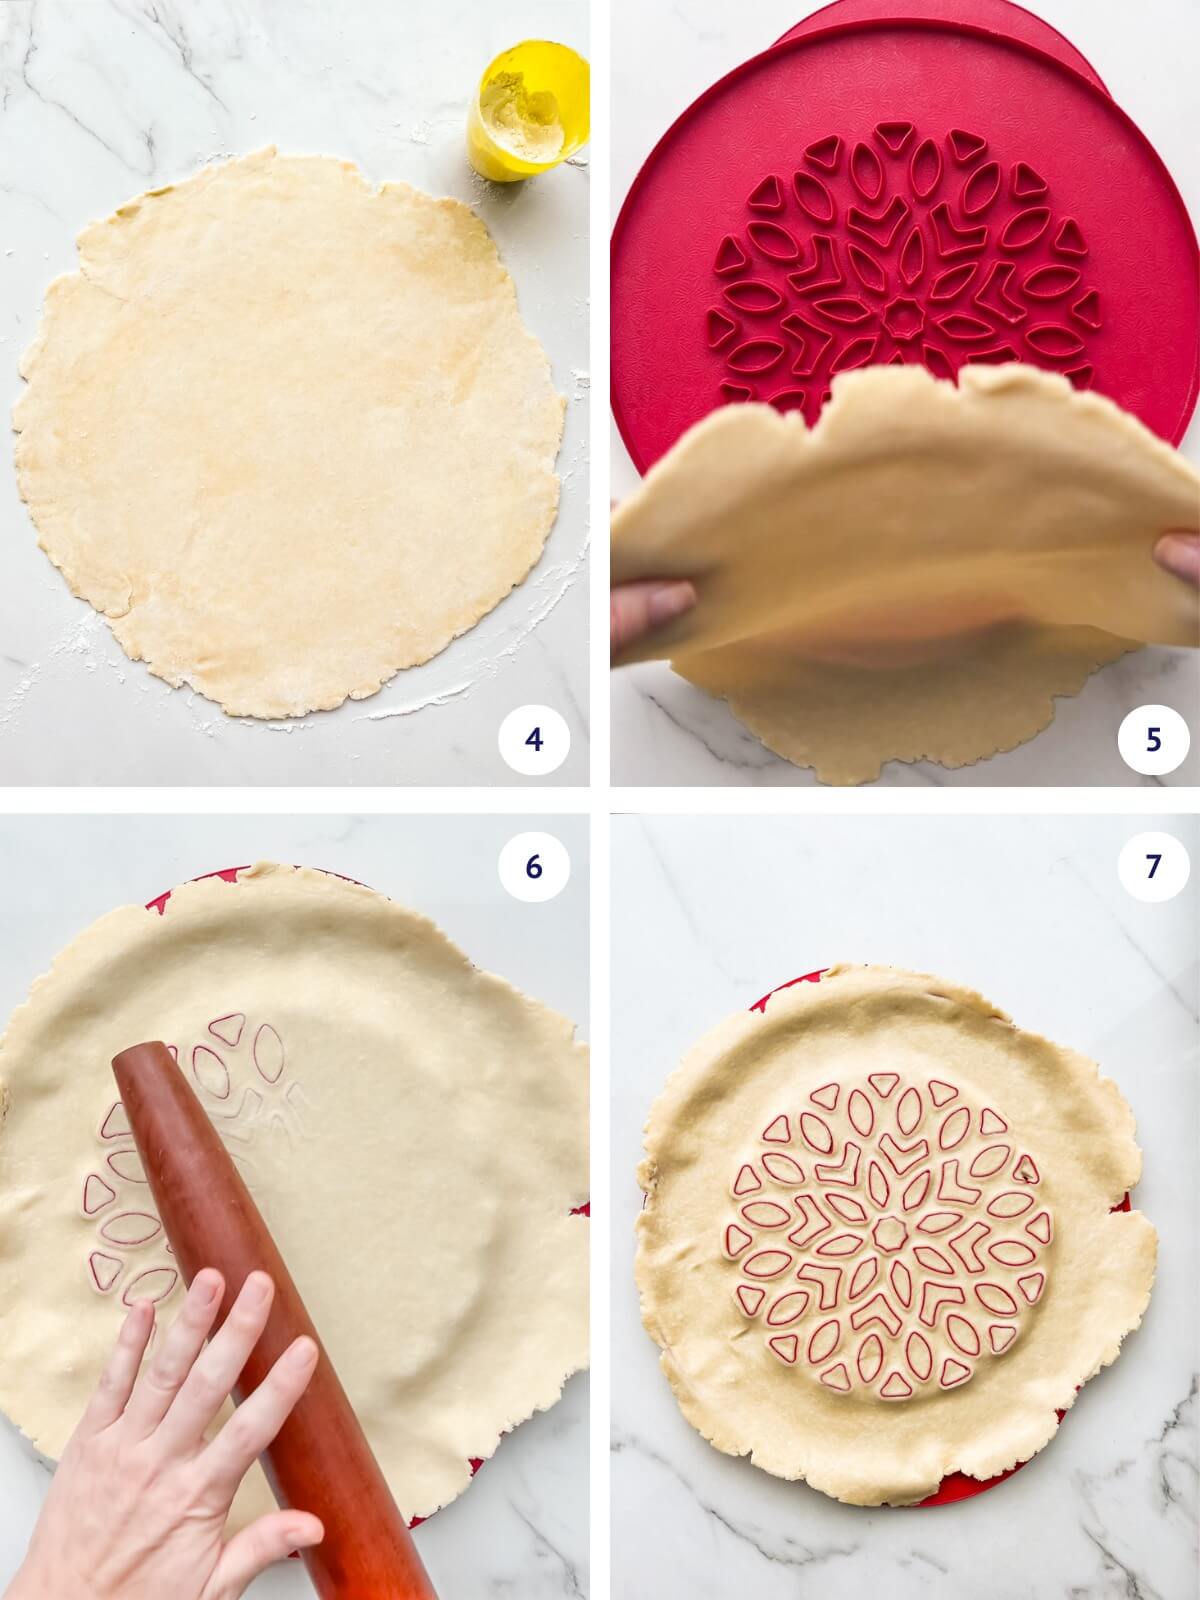
Step 2—Roll out your two disks of pie crust to at least 14 inches wide on a lightly floured surface (image 4). If using a pie crust cutter like my favourite NordicWare pie tool, lay one rolled out crust over top (image 5) and use a rolling pin to roll over the crust on the cutter (image 6) to punch out the detailed pattern (image 7).
If making pie crust from scratch scares you, be sure to check out my pie crust masterclass, which includes video tutorials for making pie crust in the stand mixer, food processor, and by hand!
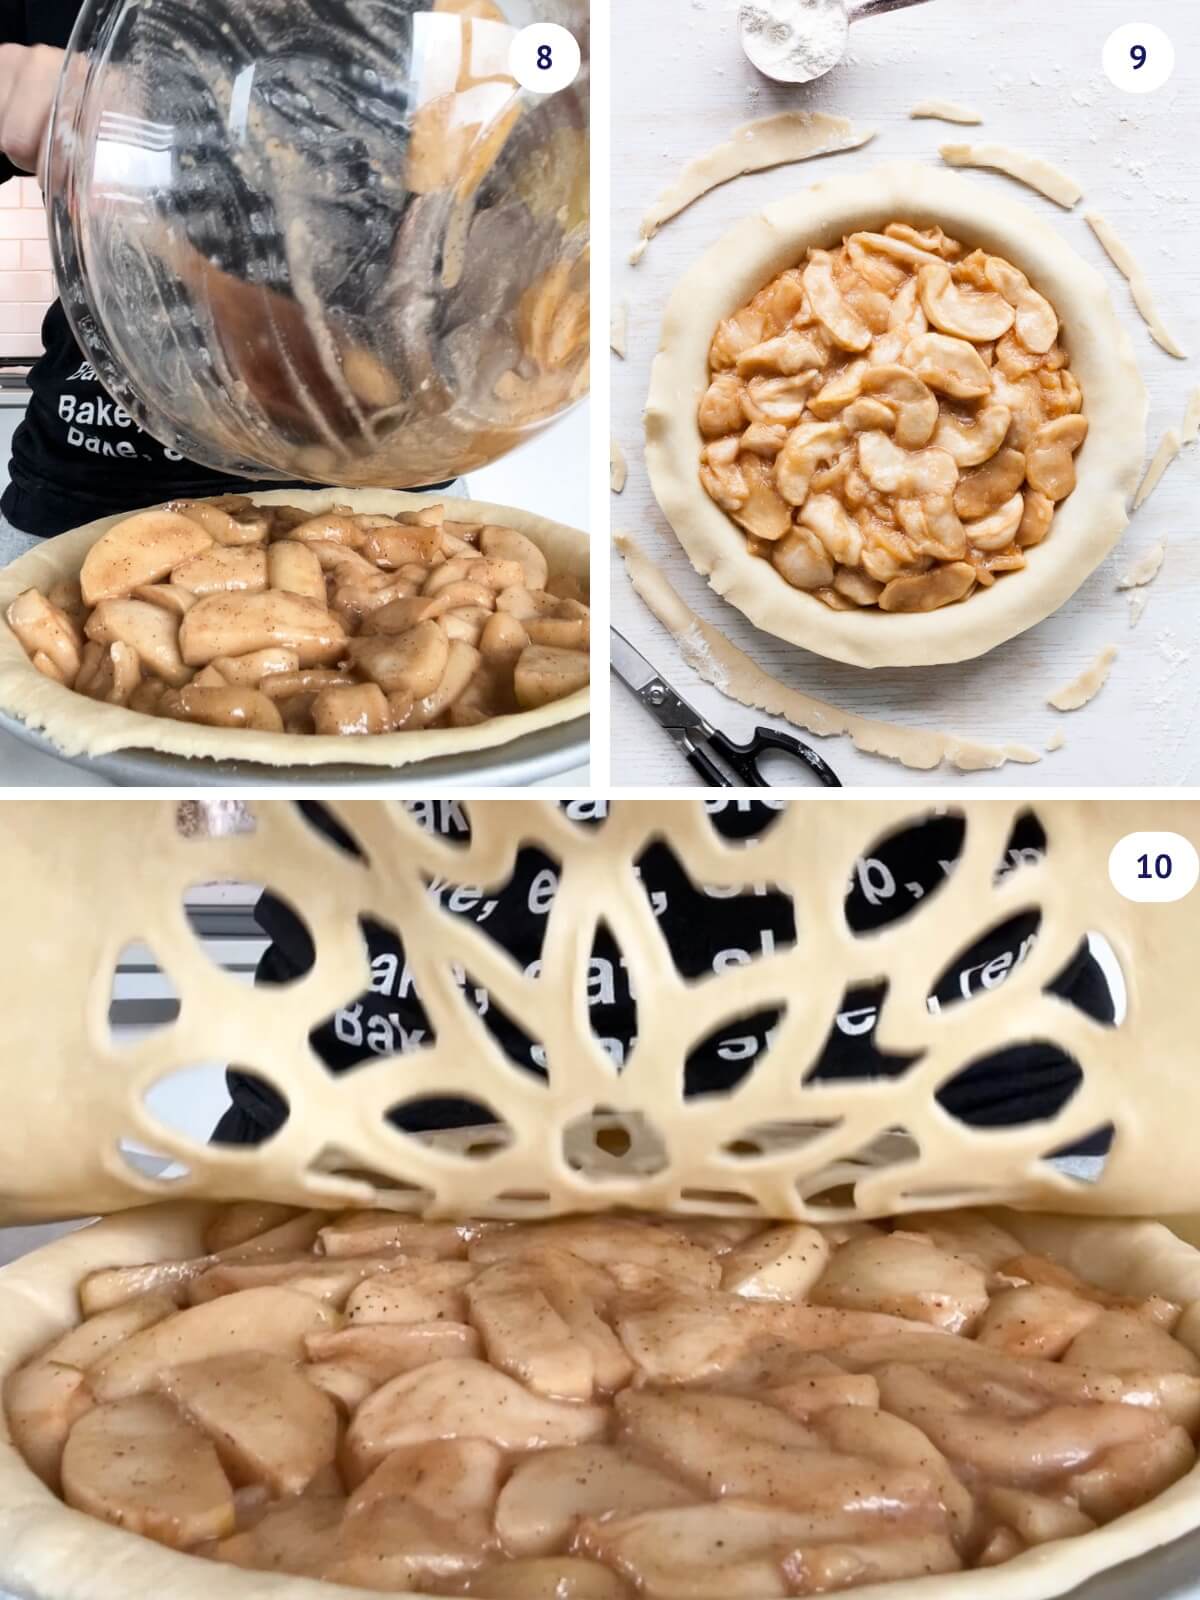
Step 3—Transfer the cooled apple pie filling to a pie plate lined with the bottom crust (image 8). Trim the excess of dough (image 9) before laying the top crust over the filling (image 10).
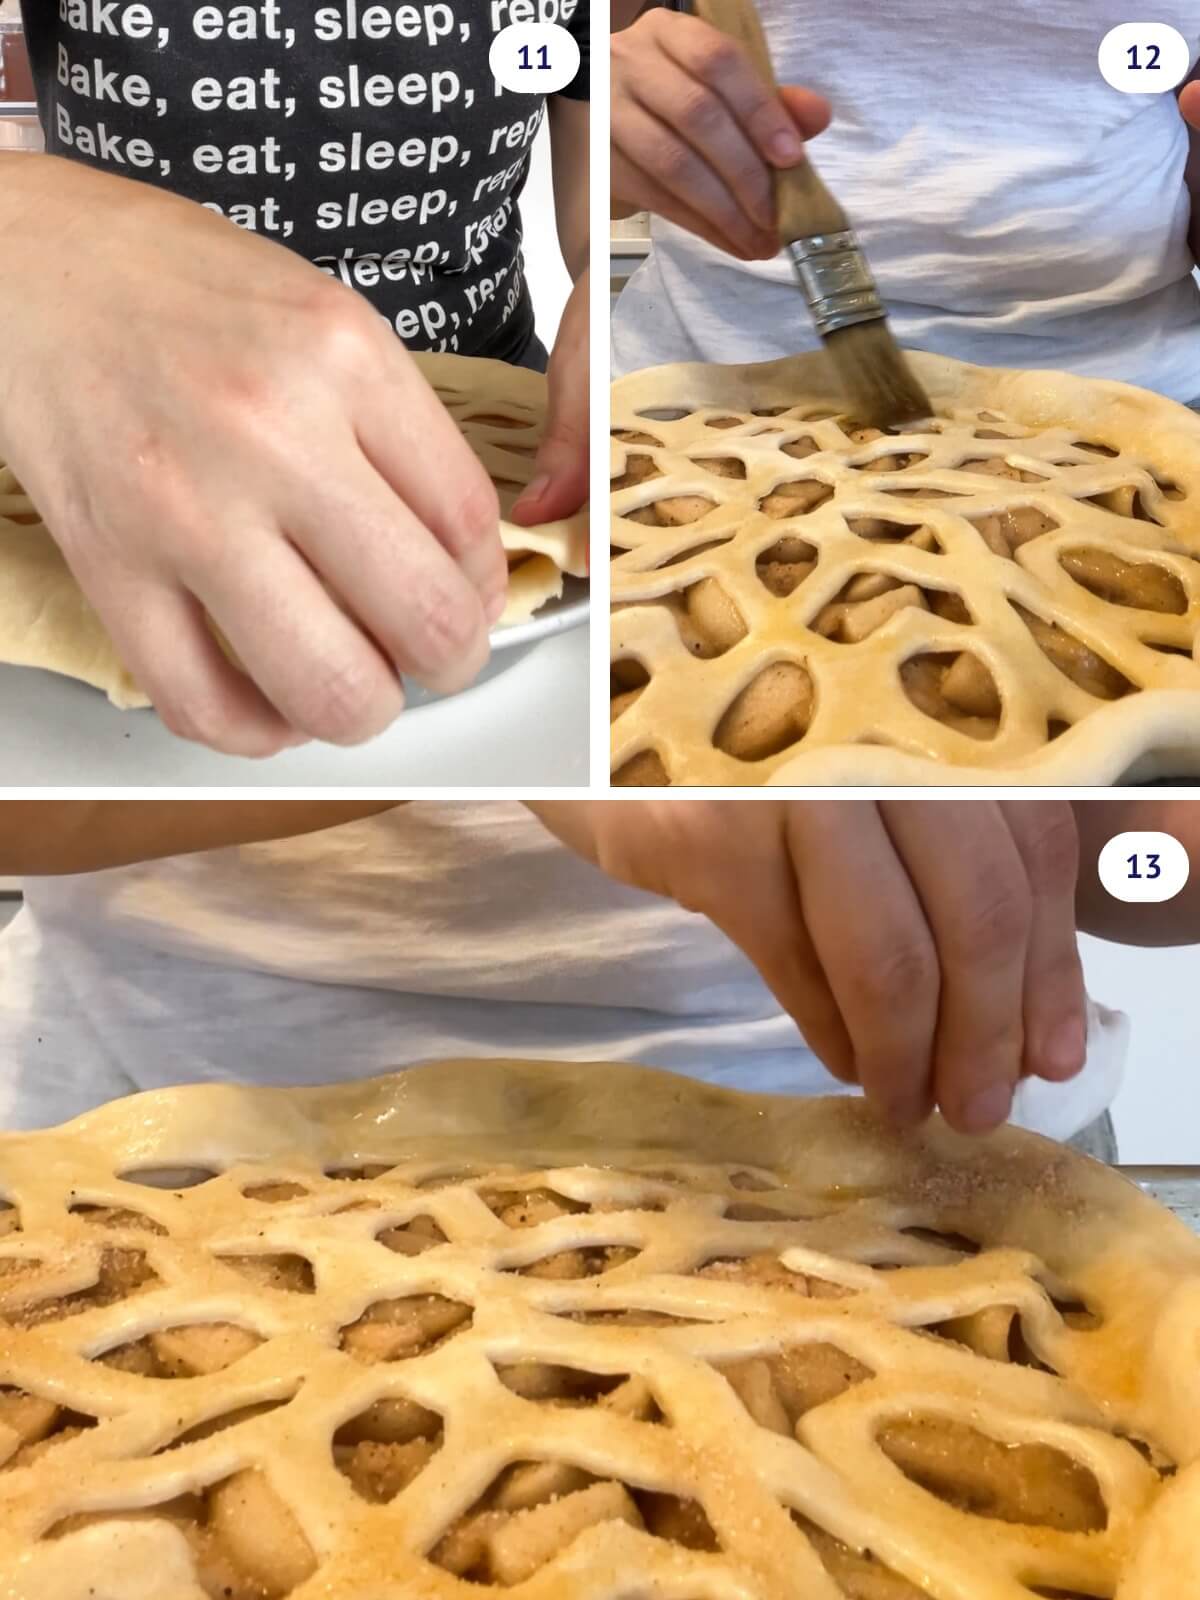
Step 4—Tuck the edges of the top crust under the bottom crust (image 11) and crimp the edge all around (image 13) before brushing the surface with egg wash and sprinkling the top with turbinado or cinnamon sugar (image 13).
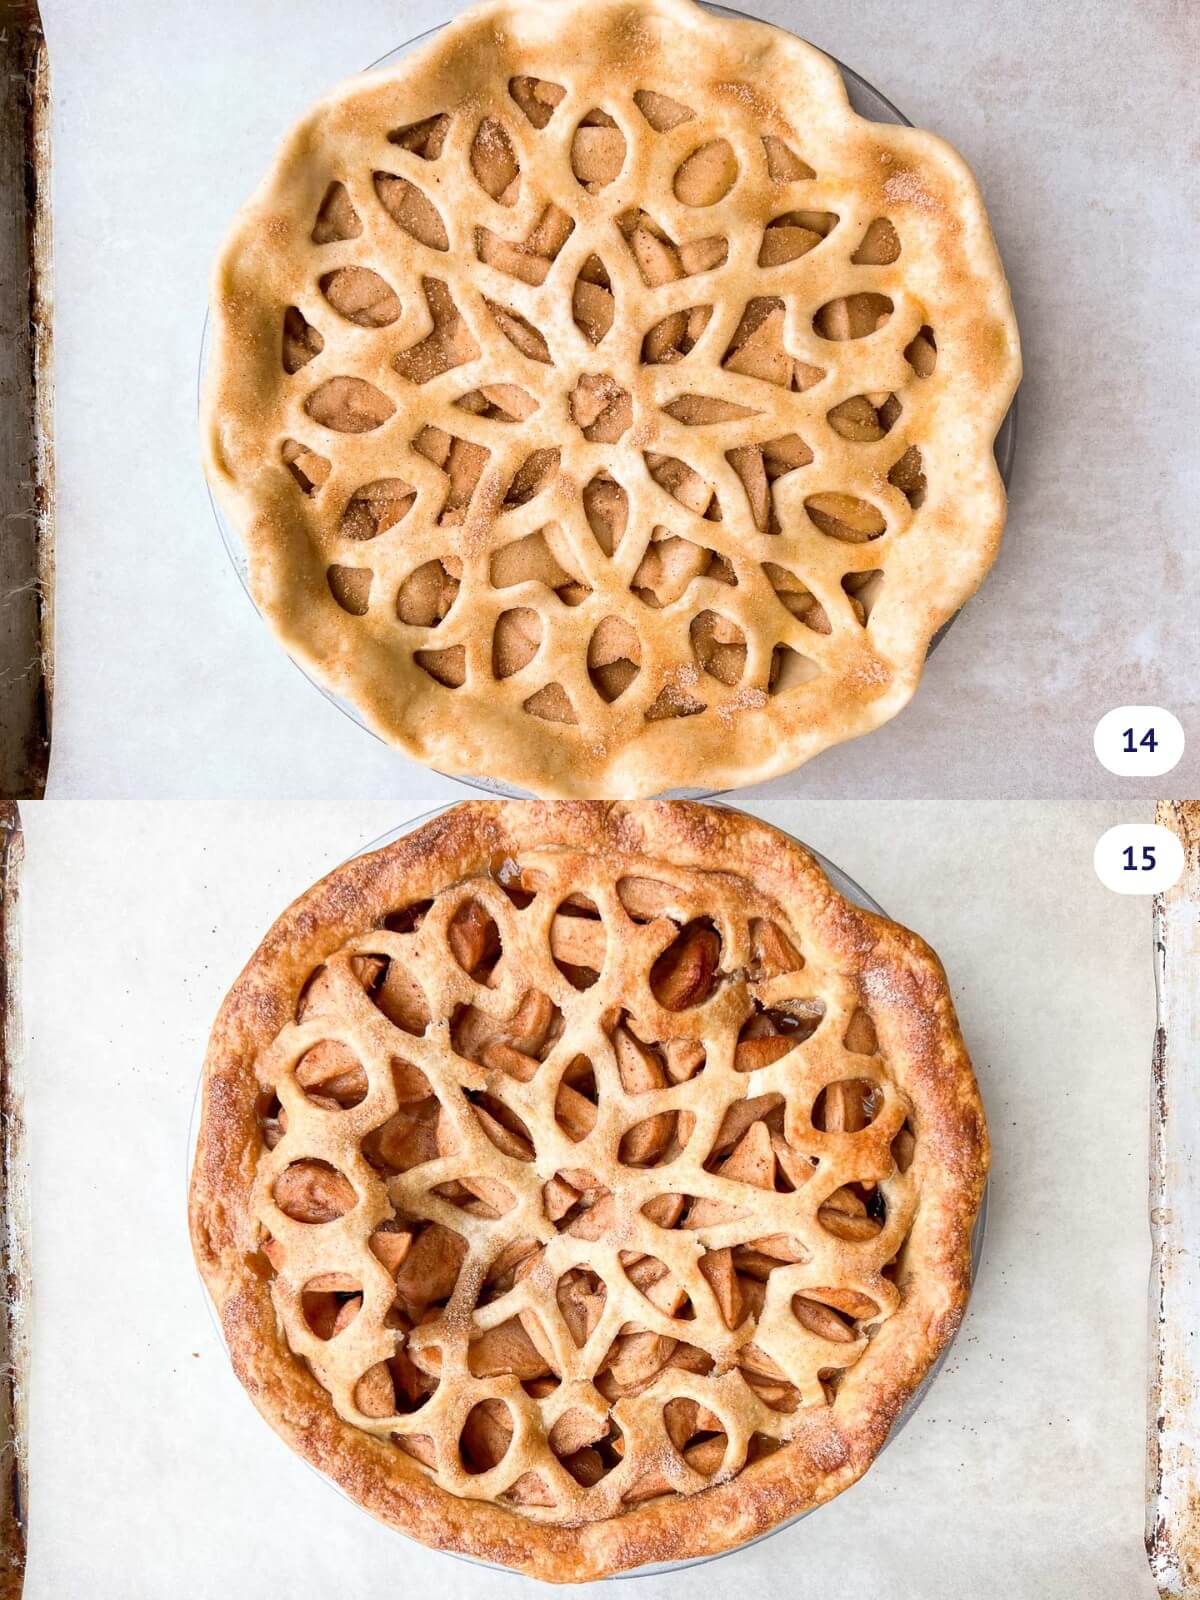
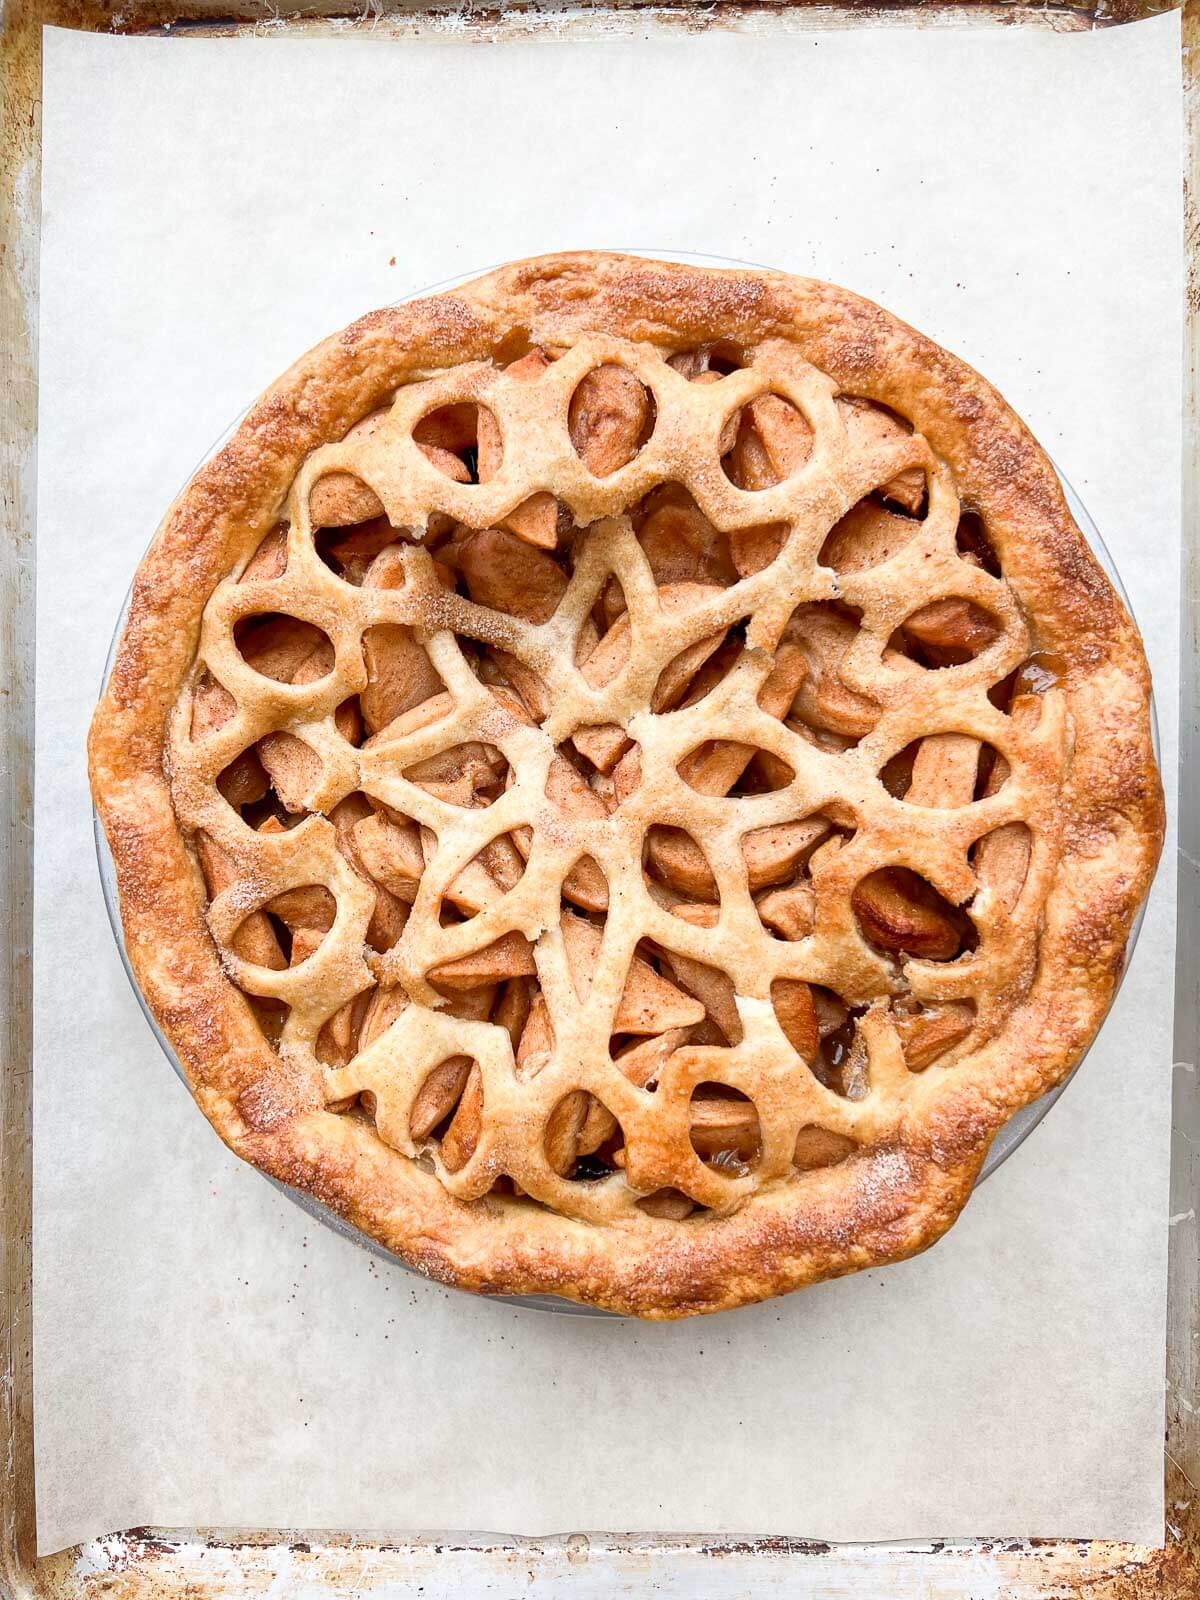
Step 5—Set the pie on a parchment paper-lined sheet pan (image 14) and bake until golden brown (image 15).
Pie baking tip: Bake the pie on the bottom rack of the oven and start the pie at a high temperature to set the crust before dropping the oven temperature to evenly bake the pie from edge to edge.
Top Apple Pie Tips
As much as I love ALL pie, I hate when I bake a double-crust apple pie and when I pull it from the oven, I find that the filling has shrunk down a good inch or two from the puffed top crust, creating a big gap between the crust and the filling. How do we bake an apple pie without that big gap?
The answer is to soften the apples first. There are a few ways to do so to yield soft and pliable fruit that you can pack more tightly into a double-crust pie:
- macerate the apples in sugar (and a little lemon juice to prevent browning), like for this peach mango pie or this blueberry pie. You can then cook down the juices before filling the pie.
- roast the apples, which is a trick I also used for rhubarb lattice pie, rhubarb crisp, and even this blueberry rhubarb crisp
- poach the apples (like for this wine-poached pear pie)
For this pie, I started with 12 cups of sliced apples (that's 4 pounds of whole apples!). Yes, you read that right: TWELVE cups of apple slices. I roasted the slices for about 45 minutes. They didn't appear to have shrunk that much, but when I compared the volume of apple after baking, I realized I was left with a lot less, like 4-to-5-ish cups. That seemed just crazy to me but I had "so little" roasted apple that when I later filled the pie plate with the apples, it filled the crust snuggly without having to make a big mound in the centre.
Imagine having to pile 12 cups of apples in a pie for a second. That'd basically be impossible had I not roasted the apples first. Perhaps the only plausible way to get all those raw apple slices into a pie would be to make a pie in a deep dish springform pan, arranging them ever so neatly to avoid any wasted space and gaps. Maybe that would work. Maybe.
APPLE PIE TIP: Roast apple slices before making pie to soften the fruit so that the filling doesn't shrink so dramatically as it bakes! You'll also be able to fill the pie with more apples this way!
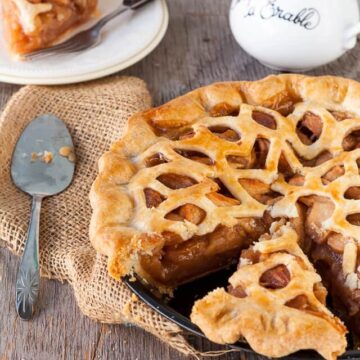
Pre-cooking the apples for pie makes the perfect apple pie. The pie cuts beautifully, and there is hardly a gap between the top crust and the apple filling. The filling has an intense apple flavour that isn't masked by a thickener because there's hardly a need for a thickener here. Fine, it takes an extra hour (when you count the time to cool the apples) to prep the apples, but I think it's absolutely worth it.
Easy Decorative Pie Crust
This pie top cutter from Nordic Ware is one of my favourite pie tools! It's super handy for making a decorative top crust quickly. It's basically a giant cookie cutter designed to make a decorative pie crust. Because of its intricacy and its size, it's a little tricky to use because you have to be sure to press evenly and hard enough to cut through the dough. Make sure your rolled-out sheet of dough is cold to make cutting easier. Press firmly and evenly all over. Use a rolling pin, rolled back and forth over the plastic cutter to put even pressure all over so you cut through the dough.
Tip: Inevitably, when you make a pie, you will be left with a pile of pie dough scraps. Gather them up and press them together to shape them into a disk and use them to make pie crust cookies!
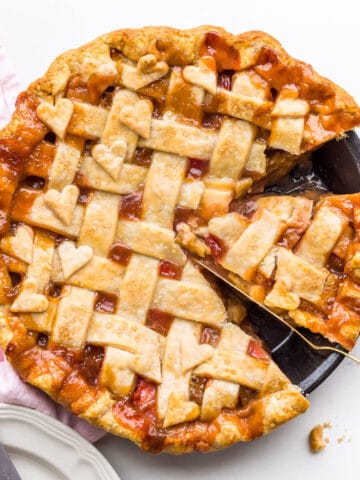
If you would prefer a more classic look, read about how to make a lattice pie crust so you can use this technique on your maple apple pie.
Other Apple Baking Recipes
While there's nothing quite like this maple syrup pie or an apple butter pie, this maple apple pie is an excellent pie to bake with fall fruit. Short on time? Try this quick and easy recipe for apple crisp or this easy apple galette instead! And for the more advanced bakers, try the classic apple tarte tatin.
If you tried this recipe for the best maple apple pie (or any other recipe on my website), please leave a ⭐ star rating and let me know how it went in the comments below. I love hearing from you!
📖 Recipe
Maple Apple Pie
Ingredients
Apple filling
- 2 kg Cortland apple(s)
- 234 grams pure maple syrup
- 100 grams maple sugar more or less depending on how sweet your apples are (sometimes I even skip this extra sugar!)
- 30 mL bleached all-purpose flour
All-butter double pie crust
- 312 grams bleached all-purpose flour
- 173 grams unsalted butter cold, cut into small chunks
- 5 mL Diamond Crystal fine kosher salt
- 105 mL cold water
Egg wash
- 1 large egg(s) don't add it to the dough! Brush it on the pastry before baking
Instructions
For the filling
- Preheat the oven to 350 °F (175 °C). Lline two half sheet pans with parchment and set aside.
- Peel and core the apples. Cut them into quarters, then cut each quarter into three.
- Place the apple slices in a big bowl with the maple syrup and toss them to evenly coat them in syrup.
- Divide the slices between the two parchment-lined half sheet pans, arranging them in a single layer. Roast the apples for about 45 minutes, rotating the pans every so often.
- Let the apples cool then toss them with the flour and the maple sugar.
For the crust
- In the bowl of a food processor, combine the flour and salt.
- Drop in the cold butter chunks and pulse until the mixture resembles coarse almond meal. Add the cold water and pulse until the mixture forms a dough.
- Divide the dough into two, pat into disks and wrap in plastic. Refrigerate for 45 minutes.
- Roll out one disk on a floured surface into a 13" disk. Transfer to a metal pie dish and trim the edges to ½". I like this dark metal pie plate available on Amazon.
- Pour filling into the pie and smooth it out.
- Roll the second disk of dough and use the Nordic Ware pie crust cutter to stamp out a pattern from the top crust, then top the pie with the crust. Trim the edge to 1" then fold the excess under. Crimp the edge of the pie.
- Whisk the egg in a small bowl and brush it over the entire surface of the pie crust. Freeze the pie for 45 minutes, then bake the pie on a baking sheet on the bottom rack for 30 minutes at 400ºF, then 50 minutes at 350ºF.
- Let cool slightly before serving.
Notes
- This recipe calls for Diamond Crystal fine Kosher salt. If using regular table salt, add half the amount or the recipe may be too salty!
- You can buy maple sugar in many markets and grocery stores in the New England area and the provinces of Ontario and Quebec. You can also order it online from Amazon.


Davi Rodrigues says
When you say 4 lbs of apples, is that after they are peeled cored and sliced
Janice says
I weighed the apples before peeling and coring them. But I'd imagine it won't make too big a difference if you weighed them after given most of the weight is in the flesh of the fruit, not the peel.
Chris H says
Can't wait to try this! I live in S. Calif. and have never seen Cortland apples in the grocery here...ever. Could I sub Granny Smith apples? Or, what would you suggest? Thanks for the help, can't wait to try this since it's slowly getting cooler here!
Shelly says
Did you pre-cook the first crust before filling? Most recipes call for this, but would be happy to skip that step! Thanks in advance!
Janice says
Hi Shelly,
I did not pre-cook the crust before filling.
Hana says
I made this for Thanksgiving and wish I had pictures of the faces of my family as they devoured it! It was truly divine! I did have to make a couple of changes: I over-roasted my apples and they turned out almost dried. Their flavor was so sweet and yummy that I went with it, but I had lost a lot in volume. So I added 2 fresh Granny Smith apples for a little tart moisture relief and tossed in a handful of dried cranberries as well. Thank you for such a unique recipe - it's a keeper!!
Karen Glenn says
Looking forward to trying this pie! Do you think I could roast the apples a day ahead and bak the next? This would simplify my Thanksgiving baking 🙂
Agnieszka says
Hi,
I don't live in North American and I'm having trouble finding maple sugar, do you have any tips on how to work around that and still getting a lot of maple flavor? Thanks!
Janice says
That's a great question. But before I answer, do you get maple syrup? Or is that not even an option? If you have maple syrup, replace the maple sugar with a little extra maple syrup and I think it will work fine in this case because a little extra liquid won't hurt the recipe much. If you can't find maple syrup though, it's really hard to replicate that flavour. I'd probably use light brown sugar, which isn't quite the same flavour, but it has nice caramel notes that would go really well with the apples. I hope that helps!
Eva says
Hello,
Does it mean you bake the cake without the pan? You remove it from the freezer and bake just "naked"?
Thanks for reply... I'm just trying to bake this one 🙂
Janice says
Hi Eva,
Definitely leave the pie in the pan after you freeze it. The chill just helps the crust set so that the butter doesn't melt out of the dough before it sets. I hope that makes sense. Let me know how it turns out!
Eva says
Hi Janice, thanks!
The pie is getting in the oven in few minutes...will keep you posted 🙂
I'm very curious about hox it will turn out 🙂
Eva
Sara says
I am having a similar issue as I don't have maple sugar. Do you think the recipe would work as well if I replace the ample sugar with maple syrup? I have plenty of maple syrup but I was afraid it will not work as well as the sugar because of the texture. Please let me what you think, I would like to make this recipe as soon as possible. Thank you!!
Janice says
Hi Sara,
You can use brown sugar. I'd hesitate to add too much maple syrup because of the water content in it. It might lead to a soupy filling if your apples are also quite juicy. Hope this helps! Let me know how it goes!
Donna says
I'm going to try your recipe because i'm very curious how it will turn out for me. I've always had the same problem of the gap between the filling and the crust.
I'm just curious as to why you freeze the pie before baking it?
Janice says
Hi Donna,
I froze the pie with the hope that it would better keep it's shape in the oven, especially the crimped edges. Sometimes I find pies lose their shape during baking when the dough for the crust is too warm to begin with. So I chilled the finished pie just before baking to ensure the crust was cold when it hit the oven. I should probably do a side-by-side test to make sure this is the case, but in the meantime, I wrote the recipe out to reflect exactly what I did. Hope that makes sense.
Let me know how your pie turns out! Happy baking!
tyler says
par baking the crust will keep pie crust shape perfectly
tyler says
i do this for my tomatoe pies
Kat says
How do you keep the syrup from boiling and burning? just tried this and within the first five minutes, the syrup had pooled at the edge of the cookie sheet and was bubbling and starting to burn. luckily I got it out before it boiled over. But now I'm afraid to try again.
Janice says
Hi Kat! I'm really sorry that happened to you when you tried to roast the apples! Is it possible your oven was too hot? I honestly didn't have any burning issues whatsoever. My apples were juicy so immediately the maple syrup combined with the juices of the apples, so rather than burning, it was more "soupy" at the beginning of the baking. Also, I split the mixture between two parchment-lined rimmed baking sheets so that the pans weren't overcrowded and so that there wasn't a risk of the syrup boiling over. I hope that helps! Let me know how it goes!
Andi R says
I have had this recipe pinned for years, and am finally making it for Thanksgiving this year! If I make the pie ahead and freeze before baking, how would you recommend baking it? Thaw first, or bake from frozen? What temperature(s) would you recommend?
Thanks!
Westerngirl87 says
Do you freeze the whole pie before cooking it or just the crust? Thanks!
Janice says
The whole pie, which means that you could make it ahead and store it in the freezer until you are ready to bake!
Andi R says
I have had this recipe pinned for years, and am finally making it for Thanksgiving this year! If I make the pie ahead and freeze before baking, how would you recommend baking it? Thaw first, or bake from frozen? What temperature(s) would you recommend?
Thanks!
Medeja says
It looks just stunning!
Janice says
Thanks! It's yummy too! I hope you get to try it 🙂